Blasphemous for Switch Has Very High Input Lag

I downloaded the demo for the Switch game Blasphemous to try it out, but I immediately found it very frustrating to play due to high input latency. The character doesn’t react to button presses immediately, making for sluggish and very imprecise controls.

I had to test it out to make sure it’s not just my imagination, and here’s what I found.

I used my Canon PowerShot S100 to record 240 frames per second slow motion video. 240fps equals 0.00416̅ of a second. By counting the number of frames between a button press and on-screen action and multiplying it by this number, you’ll get the milliseconds of input lag.

You can download the original video to count the frames yourself

Blasphemous takes 30 frames to react to my input, which equals 125 milliseconds of input lag.

For reference, I also checked Axiom Verge 2.

Download the original video

Axiom Verge 2 takes 21 frames to react to my input, which equals 87 milliseconds of input lag.

When it comes to response to user input, the difference between 87 milliseconds and 125 is vast. I had a great time playing Axiom Verge 2 and never noticed any input lag. But the 125 milliseconds it takes Blasphemous to respond to my button presses was instantly noticeable to me and severely affected my ability to play enjoyably. For a game that requires fast reactions for difficult battles, this is really unacceptable. It’s a good thing I tried the demo before purchasing this game.

Fix for Windows 10 not seeing network shared folders

If your Windows 10 device is having problems connecting to a SMB/network shared folder, the shared folder might be using an older version of SMB, or it may not allow guest logons, both of which Windows has disabled in recent versions. Here is how to re-enable these options. This worked for me to finally be able to connect to network shares again.

Enable SMB v1.0

Open the Start menu and type the word “features”; select the first result called “Turn Windows features on or off.”

In the Windows Features settings box, make sure all of the SMB options are checked:

Click OK. You may have to restart your computer.

Enable SMB guest logons

Open the Start menu and type “gpedit.msc”; select the first result.

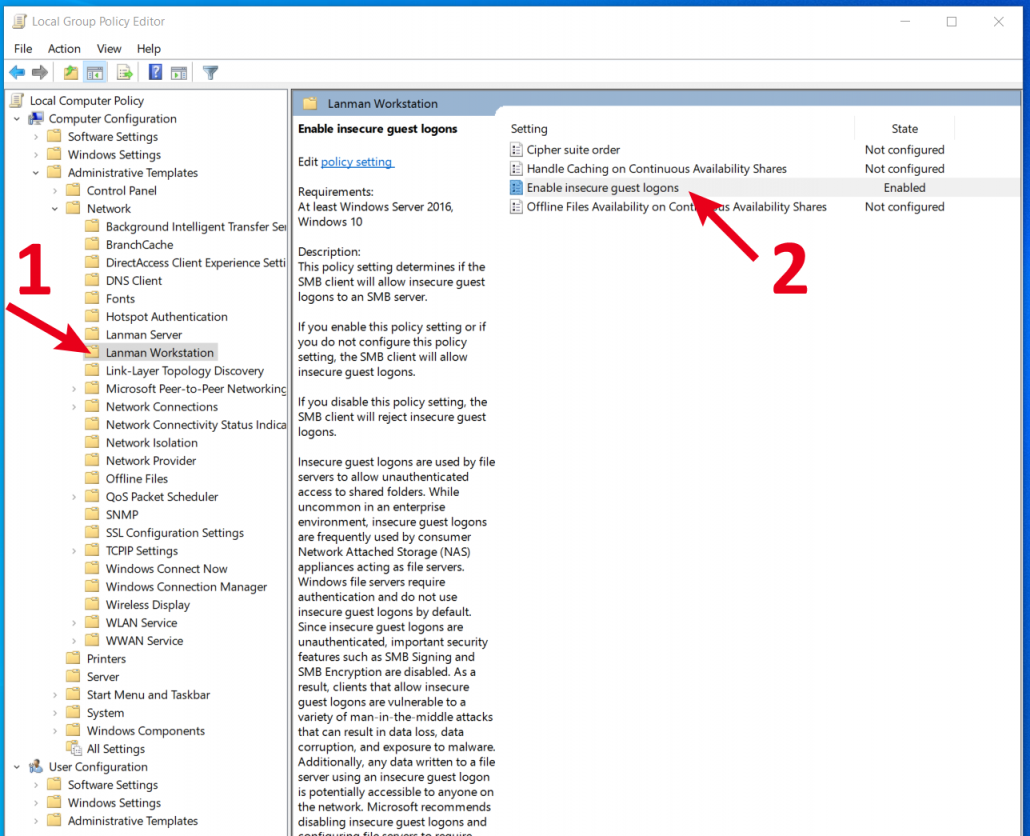
In this Local Group Policy Editor settings windows, navigate to Computer Configuration > Administrative Templates > Network > Lanman Workstation.

Double-click “Enable insecure guest logons”, select “Enabled”, Apply, then OK.

Your system should now be able to connect to any version of SMB and to unsecured shared folders. This should hopefully solve your problem with connecting to a network share.

How to migrate your WordPress site if you’ve hit the upload size limit

Note: this method works as of April 2020.

The universally recommended plugin for WordPress migration is All-In-One WP Migration. This plugin will create a site file that contains all parts and aspects of your WordPress site, which you can then upload on your new live site. Unfortunately, if the generated site file is larger than 512 MB, you cannot upload the site file to your new site without paying to remove this cap.

The site I was developing turned out to be a 880MB site file, and after some research on various sites, comments, and videos, I learned how to get around the limit and upload it.

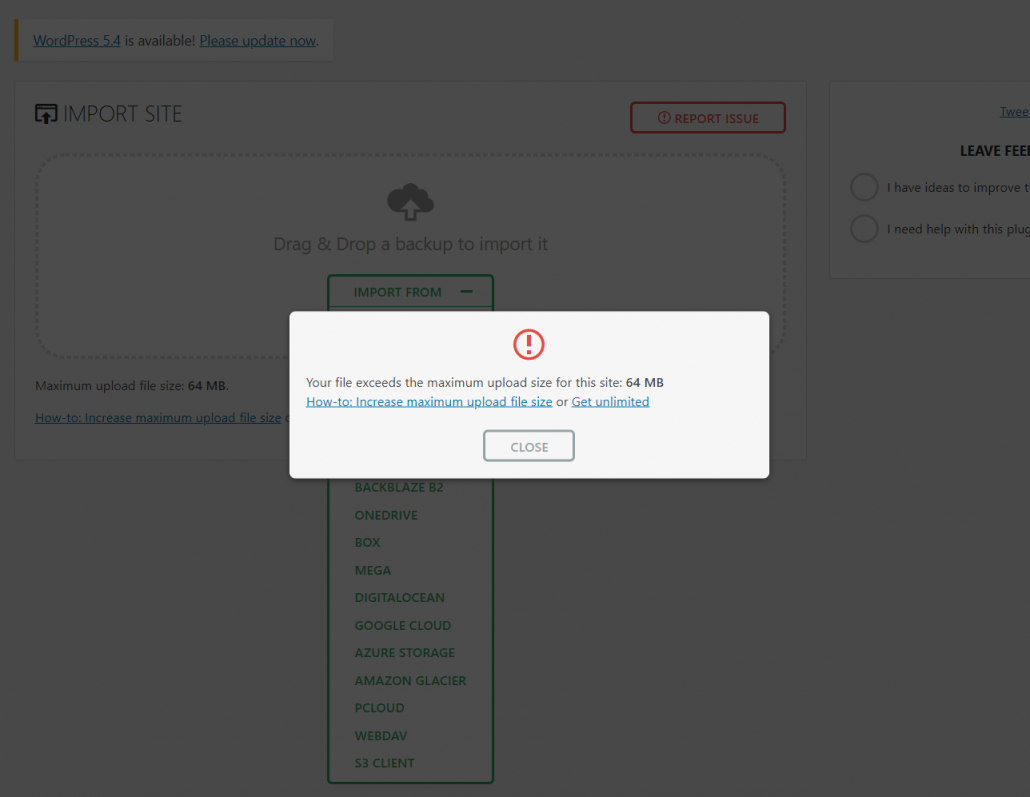
Your file exceeds the maximum upload size for this site: 64 MB

At first, the plugin will tell you that 64 MB is the upload limit, then it will suggest that you either edit some configuration files, or download their “extension” plugin which increases the file size limit to 512 MB.

You can ignore all this.

There is an older version of All-In-One WP Migration that can be easily modified to increase your upload limit to anything you want. This method works even if you’ve exported your site file using the latest version of the plugin (confirmed as of April 2020).

  • First, deactivate and delete the All-In-One WP Migration plugin (and its extension, if you installed it).
  • Next, you’ll need to download the old version, which is located on github:
    • In order to download a directory from github, you’ll first need to install the Chrome extension gitzip. Make sure you’re using actual Google Chrome, because it didn’t work for me with Vivaldi, which is a Chrome spinoff.
    • …And in order to use gitzip to download a large number of files, you’ll need to authorize it with github. Make sure you’re logged into github (create an account if you don’t have one already), then click the gitzip browser button, click “Normal”, then authorize it.
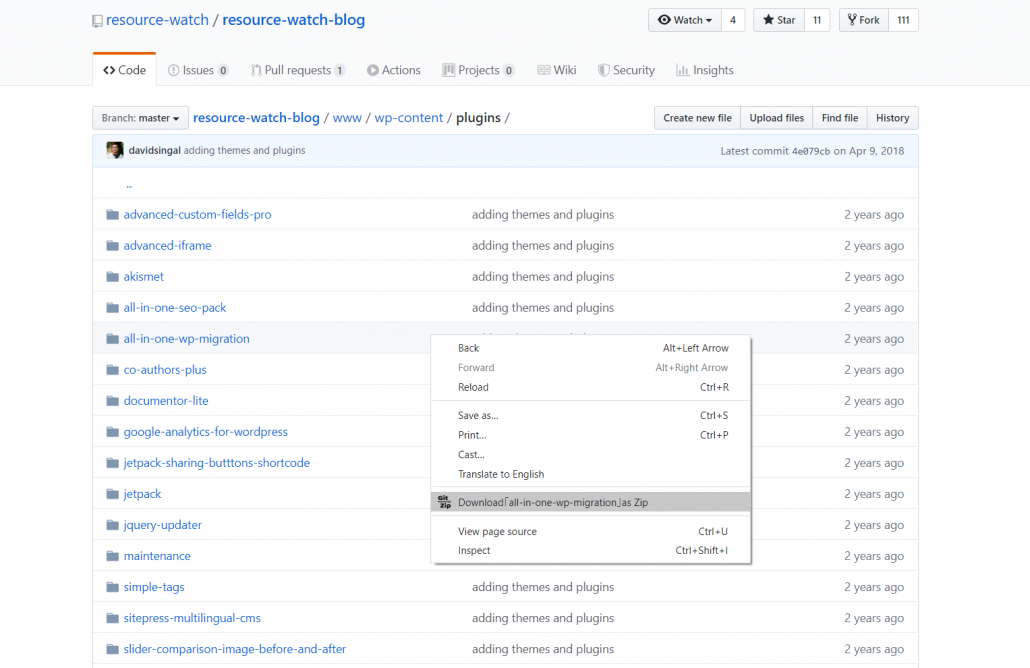
    • Now go to this page to find the old version of All-In-One WP Migration, among a long list of other plugins.
    • Do not click on the name of the plugin. You have to right-click on the empty blank space to the right of it, then select the GitZip option in your context menu.
  • The older version of All-In-One WP Migration will download to your computer as a zip file, which is convenient because it’ll be in the format WordPress needs it.
  • In WordPress, go to Plugins > Add New > Upload Plugin, and upload this zip file and activate it.
  • Now to modify the plugin so that it accepts larger uploads. This page outlines the steps in detail, but I’ll repeat them here:
  • Go to Plugins > Plugin Editor, and on the right of this page, select the new plugin, and click “Select” to load its files.
  • On the right sidebar, select “constants.php”
  • Scroll down to line 249, which is the setting called “Max File Size”
  • Add “* 20” after the long number, so that it becomes

define( 'AI1WM_MAX_FILE_SIZE', 536870912 * 20 );

  • Click Update File at the bottom of the page to save this change to the plugin.
  • Now go and upload your site file. Your site should now be migrated and ready to use.
Upload limit is now 10 GB!

You can of course change this upload limit to anything you want by editing the number “20” in the code above.

This worked perfectly for me and I was able to migrate the new site.

When you’re done, feel free to delete the WordPress plugin and remove the Chrome extension you installed earlier.

Making An External Hard Drive Into An Internal Drive

There’s more to it than just removing the enclosure and plugging it inside your PC

There are two types of external hard drives: “portable” and “desktop.” Portable drives are around 3 by 4 inches, and only have a single short USB cable to connect to your computer. Desktop drives are larger, about 4.5″ by 7″ and thick, and they need to be plugged into an outlet so they have an additional wire.

As most people know, external hard drives are just internal drives but with an enclosure around them. You can take apart the enclosure on a desktop hard drive and plug the bare drive inside a PC. But there’s more to it than that. Portable drives can’t do the same thing, because the bare drive doesn’t have internal connectors; its USB interface is its only connector.

If you’re planning on taking apart an external desktop drive to use it internally, there’s a couple things to know because it might not work.

I have a Seagate Expansion 4TB drive which I kept all my media on. When I took apart the enclosure and plugged it into my PC’s SATA ports to use it internally, the drive and its files did not show up properly. In my list of drives, it came up as unformatted.

And when I look at the drive through Disk Management, it shows up as a weird format with multiple partitions.
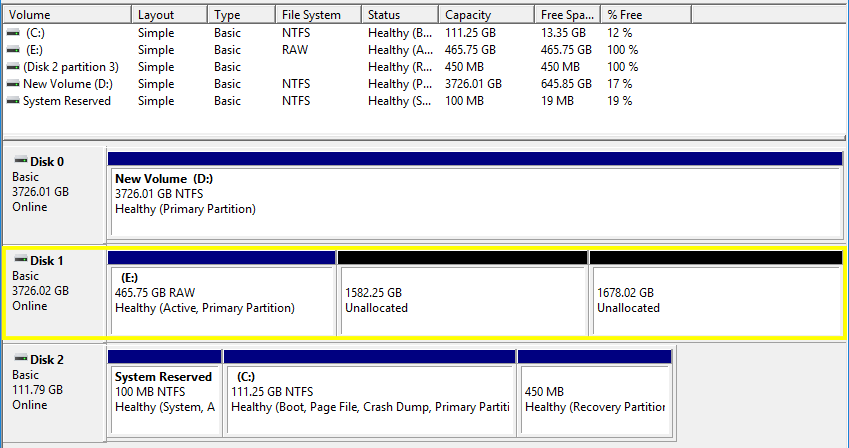
As it turns out, the enclosure actually converts the drive into a special format—a format that can’t be read through the bare drive. In order to start using it as an internal drive, I had to do the following:

  1. Copy and backup all the files you need off of the drive, because the drive has to be formatted and erased. I had to purchase another 4TB internal drive, just so I could copy all my files off of the external drive first.
  2. Remove the drive from its enclosure, and connect the bare drive to the power and data SATA ports inside your PC.
  3. Once booted up into Windows, go to This PC (formerly known as My Computer), and take note of the drive letter of this new unformatted drive.
  4. Open Disk Management by hitting Start, then start typing the word “partition”. The start menu will show an action called “Create and format hard disk partitions.” Hit enter, or click on that action.
  5. Locate your new drive by looking for its drive letter among the list of drives shown here.
  6. Right-click on the blue section of that drive, and Select “Delete partition.”
  7. Right-click on the grey left square section of that drive (where it says “Disk 1” in my image) and select “convert to GPT disk.”
  8. Now, right-click on the “unallocated” part of the drive, and select “New Simple Volume.” If you keep “Quick format” selected, then the formatting should take only a few seconds.
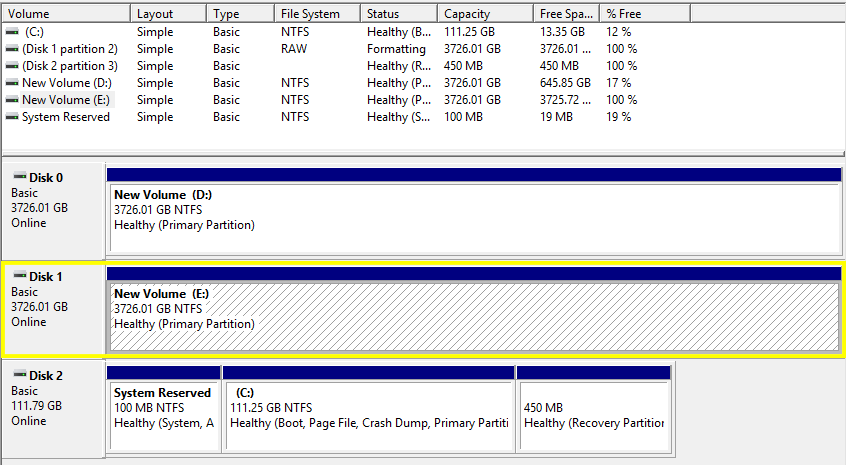
And that’s it, it should now be a regular internal drive.

One thing to keep in mind is that, supposedly, external hard drives are lower-quality drives, so it’s best to only use them for backup and media storage purposes. Using it as a constant read-and-write drive is not recommended.

Please let me know if this post helped you!

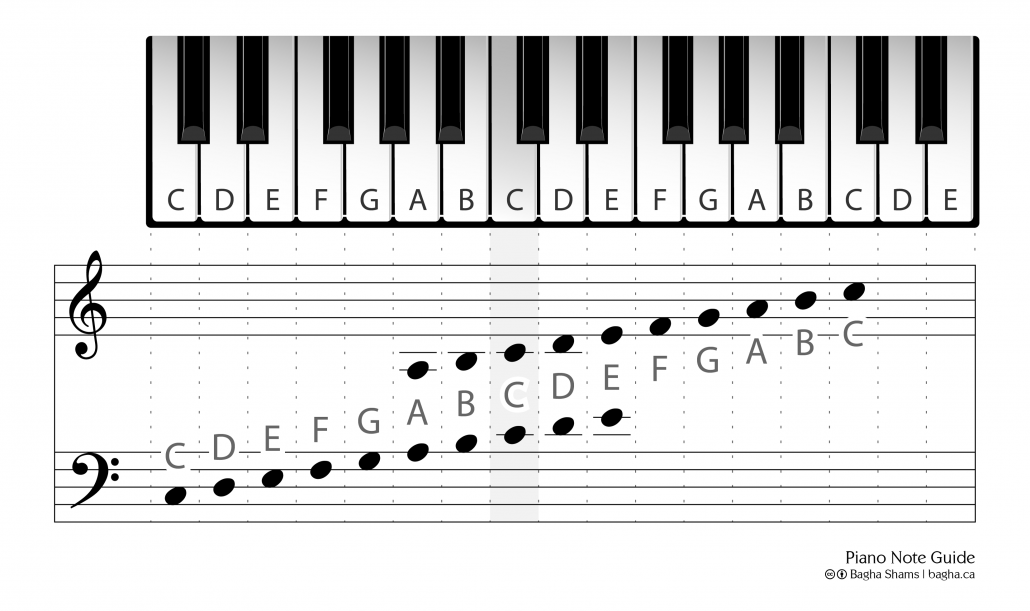
Piano Note Guide

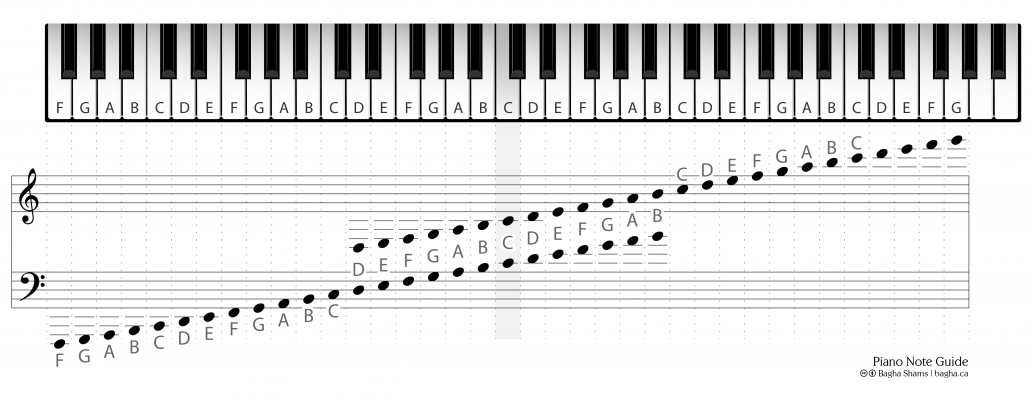
I made this piano note guide because I couldn’t find any decent quality ones online. This is simply a guide for beginners to identify notes on the stave and their counterpart keys on the piano. Feel free to download and print the images for your uses.


Piano Note Guide - Large

Piano Note Guide – Large


Piano Note Guide - Small

Piano Note Guide – Small

To download an image, right-click it and select “Save link as…”


Tags: piano key guide, piano note guide, piano cheatsheet, children’s note guide, children’s piano note guide, beginner’s piano note guide, beginner’s note guide, piano guide